Achei a prova fácil considerando o tempo de uso que já tenho do Copilot nos últimos 1 ano e meio. Tive que estudar aspectos de governança e APIs, além de outros conceitos como Copilot Spaces.
Só estou publicando sobre isso pois sinto que o meu eu do futuro vai gostar de voltar nesse post daqui uns anos, e ler sobre a minha primeira certificação profissional.
Se você já desenvolveu ou está desenvolvendo uma extensão para o Google Chrome, sabe que a parte final — o envio para aChrome Web Store— pode ser surpreendentemente trabalhosa (ou chata). Não pelo código em si, mas pelas exigências visuais da loja.
Para publicar sua extensão, o Google exige uma série de ativos em tamanhos específicos:
Ícones: 16x16, 32x32, 48x48 e 128x128 pixels.
Tiles Promocionais: Small (440x280), Large (920x680) e Marquee (1400x560).
Geralmente, isso significa abrir o Photoshop, Figma ou Gimp e exportar manualmente cada um desses arquivos, garantindo que o padding esteja correto e que as cores combinem. Se você mudar o logo, precisa refazer tudo. Se estou criando extensões para o Chrome em série, isso pode se tornar um problema.
O Chrome Web Store Assets Generator é uma ferramenta open-source, gratuita e baseada em navegador que transforma o logo da sua extensão em todos os ativos necessários para a loja com apenas um clique.
Você faz o upload do seu logo uma vez e a ferramenta gera instantaneamente todos os tamanhos de ícones e banners promocionais, prontos para download em um arquivo ZIP organizado.
🛡️ Privacidade em Primeiro Lugar
Como desenvolvedor, eu me importo com privacidade. Por isso, a ferramenta foi construída usando a HTML5 Canvas API e processa 100% das imagens no lado do cliente. Nada sai do seu navegador. Nenhum servidor recebe suas imagens, nenhum cadastro é necessário e não há chaves de API envolvidas.
🚀 Principais Funcionalidades
Geração em Um Clique: Suba o logo e veja a mágica acontecer.
Banners Customizáveis: Defina o nome da extensão, um subtítulo e escolha entre diversas paletas de cores em gradiente que seguem as diretrizes visuais do Google.
Padding Ajustável: Controle o espaçamento do ícone dentro dos banners com preview em tempo real.
Preview da Loja: Uma aba dedicada para você ver exatamente como sua listagem aparecerá na Chrome Web Store antes mesmo de subir os arquivos.
Snippet do Manifest v3: A ferramenta gera o bloco de código do manifest.json pronto para você copiar e colar no seu projeto.
Download em ZIP: Baixe tudo de uma vez, organizado em pastas icons/ e banners/.
🏗️ Stack Tecnológica
Para quem gosta de detalhes técnicos, o projeto foi uma oportunidade incrível de testar as versões mais recentes das ferramentas que amo:
React 19 e Vite 6 para uma experiência de desenvolvimento ultra-rápida.
TypeScript para garantir a robustez do código.
Tailwind CSS v4 para um design moderno e responsivo.
Lucide React para ícones e JSZip para a geração do pacote de download.
🐳 Self-Hosted e Open Source
O projeto é totalmente aberto e você pode contribuir no GitHub. Além da versão web, eu disponibilizei uma imagem Docker para quem prefere rodar a ferramenta localmente ou em sua própria infraestrutura:
docker run -d -p 3000:80 --name assets-generator paladini/chrome-web-store-assets-generator:latest
🔗 Links Úteis
Se você é desenvolvedor de extensões, te convido a testar a ferramenta e me dar um feedback:
Se o projeto te economizou alguns minutos (ou horas) de trabalho, considere deixar uma ⭐ no repositório. Isso ajuda muito a divulgar o trabalho para outros desenvolvedores!
Espero que seja útil para vocês tanto quanto está sendo para mim. Até a próxima!
Você já imaginou se pudesse ensinar a sua história — seus projetos, sua experiência profissional e acadêmica, suas habilidades e interesses para qualquer assistente de IA, de forma aberta, segura e padronizada? Essa é a proposta do MCP-Me.
O MCP-Me é um framework open-source que permite que qualquer pessoa exponha informações pessoais — como carreira, habilidades, projetos, interesses e muito mais — para assistentes de IA, usando o Model Context Protocol (MCP). Com ele, você cria um “servidor de contexto pessoal” que pode ser consultado por diferentes IAs, tornando suas interações mais inteligentes, personalizadas e humanas.
Hoje, cada IA ou chatbot começa do zero ao interagir com você. O MCP-Me resolve esse problema ao criar um perfil estruturado, que pode ser lido por qualquer agente compatível. Assim, suas conquistas, artigos, projetos open-source, livros publicados e até hobbies ficam acessíveis para enriquecer conversas, recomendações e automações.
Como funciona?
YAML + TypeScript: Você descreve seu perfil em arquivos YAML simples, validados por schemas TypeScript.
Plugins: O MCP-Me já vem com plugins para GitHub, LinkedIn, Medium, Spotify, entre outros — facilitando a integração com suas plataformas favoritas.
CLI e API: Use a linha de comando para gerar, validar e servir seu perfil, ou integre via API com outras ferramentas.
Privacidade e Controle: Você decide o que expor, como expor e para quem expor.
Diferenciais
Open-source e extensível: Qualquer pessoa pode contribuir, criar plugins ou adaptar o protocolo.
Foco em interoperabilidade: O MCP-Me segue o padrão MCP, facilitando a adoção por diferentes agentes e plataformas.
Pensado para o futuro da IA: À medida que LLMs e assistentes evoluem, o contexto pessoal será cada vez mais essencial para experiências realmente úteis.
Para quem é?
Profissionais de tecnologia que querem montar seu portfólio de forma automatizada.
Criadores de conteúdo, escritores e desenvolvedores open-source.
Qualquer pessoa que queira ter uma “memória digital” sobre você mesmo, acessível por IAs.
Vibe Code Detector: descubra se um site foi criado por IA / Vibe Coding.
Olá pessoal!
Como saber se aquele site que você acabou de visitar foi esculpido linha a linha por um humano ou gerado em segundos por um prompt certeiro no v0.dev ou no Cursor?
Como entusiasta (e praticante) dessa nova era de IA, percebi que toda ferramenta de IA deixa uma assinatura. É um “DNA” digital que, embora às vezes sutil, é quase onipresente. Foi por isso que decidi criar o Vibe Code Detector.
O que é o Vibe Code Detector?
O Vibe Code Detector é uma extensão open-source para o navegador que realiza uma análise forense em qualquer página web para identificar as ferramentas, IDEs e plataformas de IA utilizadas na sua construção.
Não é mágica; é heurística. Enquanto navegamos, a extensão lê os sinais que os agentes de IA e geradores de código deixam para trás.
O que ele detecta?
A extensão foca em duas frentes principais:
IDEs e Agentes de IA: Identifica marcadores de ferramentas como Cursor, Windsurf, Trae, Replit Agent, Devin e o novo Claude Code.
Plataformas de Geração: Detecta sites criados via v0.dev, Lovable.dev, Bolt.new, Stackblitz e Google AI Studio.
Como funciona (A Ciência das Heurísticas)
Para chegar a um veredito — que varia entre Humano, Provavelmente IA ou Quase certamente IA — a extensão executa um escaneamento multi-camada:
Densidade de Tailwind: prompts de IA tendem a gerar componentes com uma razão altíssima de classes utilitárias por elemento. Nós calculamos essa densidade.
DNA de Shadcn/Radix: identificamos padrões específicos de atributos data-radix-* combinados com variáveis de CSS padrão do Shadcn.
Iconografia Lucide: por ser a biblioteca padrão de quase todos os geradores de IA atuais, ela é um forte indicador.
Assinaturas de IDE: procuramos por marcadores internos (como o clássico __cursor) ou blocos de comentários típicos de geradores.
O resultado é um score ponderado que revela a procedência técnica do projeto em tempo real.
Por que isso importa?
Mais do que apenas uma ferramenta de curiosidade, o Vibe Code Detector é um experimento sobre a transparência na web. À medida que a fronteira entre o código escrito por humanos e o gerado por máquinas se torna mais tênue, entender a arquitetura por trás dos produtos que consumimos nos ajuda a aprender e a mapear a evolução dessa nova stack tecnológica.
100% Open Source e Privacidade em Primeiro Lugar
Assim como o MCP-Me e outros projetos que lancei recentemente, o Vibe Code Detector é totalmente aberto (licença MIT).
Sem coleta de dados: A análise é feita localmente no seu navegador.
Sem rastreamento: Sua navegação continua sendo sua.
Comunidade: Novas ferramentas de IA surgem toda semana. O projeto foi desenhado para ser fácil de contribuir com novas heurísticas.
Como instalar?
Via Chrome Web Store
Basta acessar a Chrome Web Store no link abaixo e clicar em “Instalar”:
Vá em chrome://extensions/, ative o "Modo do Desenvolvedor".
Clique em “Carregar sem compactação” e selecione a pasta.
Ou, se você for do time que prefere o terminal:
git clone https://github.com/paladini/vibe-code-detector.git
cd vibe-code-detector
npm install && npm run build
Vamos construir juntos!
A stack de “Vibe Coding” está mudando rápido. Se você descobriu uma nova assinatura de alguma ferramenta ou tem ideias para refinar os pesos do nosso algoritmo de confiança, abra um PR!
Espero que essa ferramenta ajude você a enxergar a web com outros olhos. Se gostar do projeto, não esqueça de deixar uma ⭐ lá no GitHub!
Tenho muitas conexões aqui no LinkedIn de diferentes momentos da minha vida, de diferentes experiências e contextos. Muitos eu conheço apenas vagamente ou admiro, já outros são colegas, amigos, líderes e ex-líderes, entre outros.
Entretanto, tem coisas que poucas pessoas sabem. Uma delas é que eu já fui tradutor de diversos apps e softwares, inclusive do projeto Gnome.
Em uma época onde até acesso a sites como Babel e Google Tradutor eram limitados, comecei traduzindo softwares de maneira “não-oficial”, pegando apps do finado “Symbian OS” (um sistema operacional da Nokia para celulares), realizando traduções e disponibilizando os pacotes já traduzidos em sites como 4Shared. Após um tempo fazendo isso com apps menores, comecei a traduzir softwares desktop, como o System Ninja e o iSpy Connect. Eu ficava muito feliz quando encontrava softwares open-source que tinham as traduções no código-fonte, facilmente acessíveis.
Um pouco mais velho, ali pelos 18–19 anos de idade, auxiliei na tradução do livro “Mastering Bitcoin”, do Andreas M. Antonopoulos (livro publicado em 2014).
Ao longo dos anos que fiz traduções (no começo, sem fazer menor ideia do que eu estava fazendo), tive a possibilidade de traduzir cerca de 5 a 6 apps de celular, 10 softwares desktop, 1 livro digital e legendei dezenas de vídeos.
Eu nunca fiz um curso de inglês (não tinhamos dinheiro pra isso), mas o importante foi meter a cara e tentar ajudar.
Se você faz algum curso ou disciplina em plataformas Moodle — seja na universidade, num instituto federal ou num curso online — provavelmente já passou por isso: você navega pelo conteúdo durante o semestre de forma linear, módulo por módulo, e quando chega a hora de revisar para a prova, precisa refazer toda essa jornada.
O conteúdo está fragmentado por design. Aula aqui, material complementar ali, PDF num módulo diferente, vídeo em outra página… Isso torna a revisão lenta e cansativa.
Pensando nisso, criei a Moodle Content Extractor for NotebookLM — uma extensão gratuita para Chrome, Edge, Brave e outros navegadores baseados em Chromium que captura o conteúdo textual da sua disciplina enquanto você navega, e exporta tudo em Markdown pronto para usar no NotebookLM.
🤔 O problema que essa extensão resolve
O Moodle é uma das plataformas de ensino mais usadas no Brasil e no mundo, principalmente em universidades. Mas ele não foi projetado para facilitar a revisão do conteúdo — foi projetado para dar acesso a ele.
O resultado é que o conteúdo fica espalhado: você precisa lembrar em qual módulo estava aquela explicação importante, qual atividade tinha o texto mais relevante, qual página tinha as referências bibliográficas…
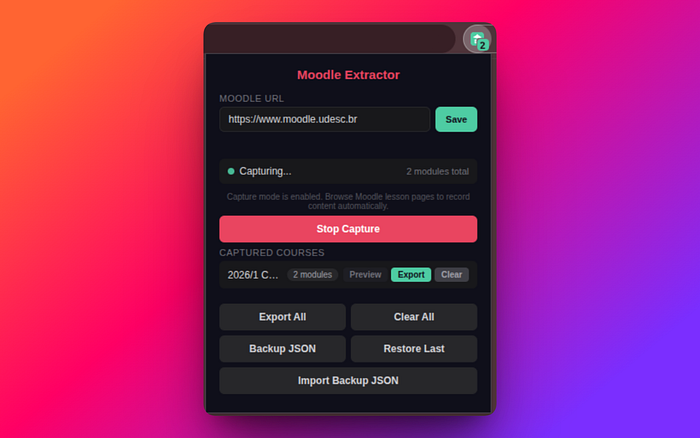
A ideia da extensão é simples: capturar o conteúdo textual de forma passiva, enquanto você já está navegando pelas páginas da disciplina, sem nenhum esforço extra. Você só precisa clicar em “Iniciar Captura” uma vez.
✨ Como funciona?
A extensão funciona de forma discreta. Depois de definir a URL base do seu Moodle e ativar a captura, ela registra automaticamente o conteúdo textual das páginas que você visita — organizando tudo por curso e módulo com base nos breadcrumbs do Moodle.
Ao final, você exporta tudo como um único arquivo .md (Markdown) com uma estrutura limpa:
O NotebookLM lida muito bem com essa estrutura porque o conteúdo já vem agrupado por disciplina e módulo, pronto para funcionar com o Gemini.
🚀 O que você consegue fazer com esse conteúdo?
Aqui mora o verdadeiro poder da extensão. Com o arquivo Markdown exportado e os recursos mais recentes do NotebookLM, você consegue:
🎙️ Ouvir um podcast de resumo sobre todo o conteúdo da disciplina — de altíssima qualidade, diga-se de passagem
🃏 Criar flashcards para SRS (Sistemas de Repetição Espaçada), como o Anki
🗺️ Gerar um mapa mental resumindo todos os conceitos abordados
📊 Criar resumos em vídeo, infográficos e apresentações de slides
❓ Fazer perguntas diretamente ao conteúdo da disciplina, como se fosse um tutor particular
Em vez de passar horas relendo materiais lineares, você tem um assistente de IA que conhece todo o conteúdo da disciplina e pode te ajudar a estudar de formas completamente diferentes.
🎯 Fluxo de uso recomendado
Esse é o workflow que tem funcionado bem na prática:
Navegue pelas páginas de aulas, atividades e módulos normalmente
Clique em “Parar Captura” quando terminar
Exporte o curso como Markdown
No NotebookLM, crie um novo notebook
Faça upload do .md exportado e do PDF do plano de ensino da disciplina
Peça ao Gemini para gerar flashcards, criar podcasts de resumo, montar mapas mentais…
Dica: Para deixar o contexto ainda mais focado no material de ensino, além do .md, envie também um PDF com o plano de ensino (syllabus) e as referências bibliográficas da disciplina. Isso ajuda o NotebookLM a entender melhor o escopo do conteúdo.
🛡️ Privacidade e segurança dos dados
Um detalhe que levei muito a sério no desenvolvimento: todos os seus dados ficam no seu próprio navegador. A extensão não tem backend, não usa servidores externos, não envia absolutamente nada para a nuvem.
Tudo é armazenado localmente no chrome.storage.local. Para evitar perda de dados durante o uso, implementei algumas proteções extras:
Gravações com verificação de integridade para evitar corrupção de dados
Capturas serializadas para reduzir risco de condição de corrida
Snapshots automáticos antes de qualquer ação destrutiva
Exportação e importação de backup em JSON
Restauração manual do último snapshot salvo
🔧 Funcionalidades
Captura automática do conteúdo enquanto você navega pelas páginas do Moodle
Agrupamento por curso e módulo com base nos breadcrumbs do Moodle
Exportação individual por curso ou exportação de todos os cursos de uma vez
Extração de links de vídeos e attachments (PDF, DOCX, PPTX)
Zero dependências externas — sem build step
Arquitetura local-first: sem servidor externo necessário
👥 Para quem é?
Estudantes universitários que usam Moodle no dia a dia
Pessoas fazendo cursos online em plataformas baseadas em Moodle
Professores e tutores que querem criar materiais de revisão rapidamente a partir do próprio conteúdo do curso
Qualquer pessoa que queira transformar conteúdo textual denso e fragmentado em algo mais fácil de absorver
A extensão não tem dependências externas e não precisa de build step — o que facilita muito a entrada de novos contribuidores. Se quiser contribuir, comece pelo CONTRIBUTING.md.
📚 Considerações Finais
O Moodle foi criado para dar acesso ao conteúdo educacional, não para facilitar a revisão ou a criação de materiais de estudo a partir dele. Com ferramentas como o NotebookLM e uma extensão simples, dá para preencher essa lacuna e transformar aquelas disciplinas mais densas — ou mais chatas, como alguns diriam — em algo muito mais rico e aproveitável.
Se você testar, me conta nos comentários como foi a experiência! Feedback, sugestões e contribuições são muito bem-vindos. 🎓


![[TUTORIAL] How to easily convert Audible AAX files to MP3 on Linux](https://blogger.googleusercontent.com/img/b/R29vZ2xl/AVvXsEgD5_rsF5EDrhvemg5iXWT5gDTEFsrn3AeekUFCpNLoXnR2zd5bPsEDpUiDbK0IDzWPD0QNYdvIa7Ige66p_xgoluWgNDiOnvheZ9gba2eADKBYpYxo-X2_9VH5V-_xtzHxGC3gg1zyJZM9/s72-c/68747470733a2f2f692e696d6775722e636f6d2f3136367958385a2e6a7067.jpeg)

![[Tutorial] How to install the unaccent extension for PostgreSQL 9.3](https://blogger.googleusercontent.com/img/b/R29vZ2xl/AVvXsEjcoq9MiH90G8uctdK-lhKJOFlbqKDaikkr0aiRYF2OYvxSztQ5HvRSk-6UY630Dq7ybpevLD7EQqCMrJnFz2v3ZzFivvFQkWpfIg1QjPlfhqKzf1otFUbjno2E5OA4K4iNwQ02Blz6LAMH/s72-c/postgresql-the-world-most-advanced-open-source-database-postgres-sql-unaccent-extension-install-fernando-paladini.jpg)
![[Tutorial] Como instalar impressoras HP no Ubuntu / Linux](https://blogger.googleusercontent.com/img/b/R29vZ2xl/AVvXsEjmXPOCfz6Rehyphenhyphen1ejh0nvDOicJdnyl4YjgYDvfqTMy_uIPBqKOddzsWNT3cCGn2yZC3DX16IpNx1h0qJ1x9RwXFX5rxs-Yv8SdSh8DdskcaFp4BMzrFwgk9G5HCJBX5DudGUOrKaaRI8ZRL/s72-c/HP-Device-Manager-Linux-Ubuntu-Elementary-Printers-Impressoras.png)
![[Tutorial] Como ativar o clique no botão do meio (scroll) do mouse no Fedora / Ubuntu / Gnome](https://blogger.googleusercontent.com/img/b/R29vZ2xl/AVvXsEgShl-MKryl4x5scVHnq6d4yd7HbNAkXY1ZgdKUir5RaAvKgy-e5QqCGp-AwPY5x9fx7KHRZGrugrE-R4GJzPzGZLyKAz_qjQ4iEu5Qpe03C53vHmTXpSeNyPl__4ZMpbcL7oCPfYWvu2f6/s72-c/mouse-middle-button-click-center-fernando-paladini-tutorial.png)


![[TUTORIAL] Como desinstalar / remover pacotes .RPM no Fedora?](https://blogger.googleusercontent.com/img/b/R29vZ2xl/AVvXsEiDBfUx5Stuo2oH_emtIv5wfpbG502N2NbtRg4lsKu6eRUdPVBKughOGPeae9BLrWmRveZPpY5Bzqi-nPL9cigRUUk2pOAeljWrvcQygM6UFEi27QwRthqWkb7jG5ow8iCi3SqH_J3qo0sa/s72-c/fedora-wallpaper-como-remover-desinstalar-pacotes-programas-rpm-how-to-uninstall-remove-packages-rpm-fernando-paladini.png)
![[Dica] Como evitar que o servidor / Dyno do Heroku durma?](https://blogger.googleusercontent.com/img/b/R29vZ2xl/AVvXsEg8d3u8UPEOB_D_S27hwVivO3OXgfsrN1TBIQKNn8Gi64sZ8CyvltVW-CQ7XpSKOh3TACpUDHNuyAkUeQgaF6X6eNeN-dj1M5_Z-3ShKZ6xKe-c8x4f1naic__TcuCfzB_EUboqCcGvDPSz/s72-c/heroku-login-1920x1200-tutorial-servidor-dormir-dyno-evitar-idle-fernando-paladini.png)