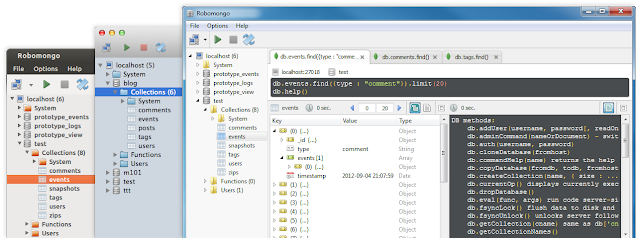
How to use Robomongo to connect to MongoDB server running in a Docker container inside AWS EC2
Recently I've meet the awesome Rocket.Chat and for internal reasons I need to access its database using Robomongo, a cross-plataform MongoDB client. The problem is that Rocket.Chat was running in a Docker container, it's MongoDB database was running in another Docker container, all running inside an Amazon Web Service (AWS) EC2 instance.
I thought that would be very hard to connect to my MongoDB database using Robomongo, but it was actually quite easy. In the following steps you'll discover how to use Robomongo to connect to a MongoDB database running in a Docker container inside an AWS EC2 instance.
1º Step) Discover your EC2 instance public IP and make sure you can access it through SSH. You can find your instance public IP from your EC2 Management Console:
2º Step) Discover the IP from Docker container running your MongoDB server / database. In order to do that, login to your AWS EC2 instance through SSH and then run:
docker inspect --format '{{ .NetworkSettings.IPAddress }}' <YOUR_MONGODB_DOCKER_INSTANCE_NAME>If you don't know your instance name, type "docker ps" and try to figure it out. In my case the instance name was "chat_db_1", so I run:docker inspect --format '{{ .NetworkSettings.IPAddress }}' chat_db_1And it gives me:[ec2-user@ chat]$ docker inspect --format '{{ .NetworkSettings.IPAddress }}' chat_db_1
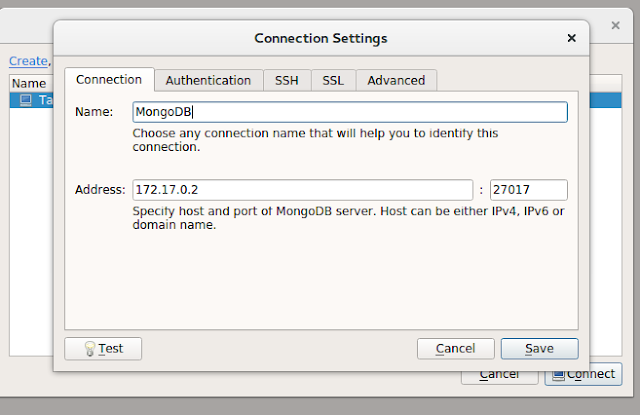
172.17.0.2From here we'll call this value by "MongoDB IP". 3º Step) Now that you have the public IP from your AWS EC2 instance and also the IP from the Docker container running MongoDB, open Robomongo and create a new connection filling the "Address" field with MongoDB IP and the "Port" field with 27017 (MongoDB default port):
Now go to the "SSH" tab and fill the fields with the following:
SSH Address: public IP from your AWS EC2 instance. Port 22.
SSH User Name: "ec2-user"
SSH Auth Method: select "Private Key".
Private Key: select the .pem file you use to access your EC2 instance through SSH.
Right now you should have the following:
4º Step) Done! Now you can visualize, edit and insert new data as you want.
If you have any questions or issues following this tutorial, let me know through the comments. Leave your comment if you liked it, too!


![[TUTORIAL] How to easily convert Audible AAX files to MP3 on Linux](https://blogger.googleusercontent.com/img/b/R29vZ2xl/AVvXsEgD5_rsF5EDrhvemg5iXWT5gDTEFsrn3AeekUFCpNLoXnR2zd5bPsEDpUiDbK0IDzWPD0QNYdvIa7Ige66p_xgoluWgNDiOnvheZ9gba2eADKBYpYxo-X2_9VH5V-_xtzHxGC3gg1zyJZM9/s72-c/68747470733a2f2f692e696d6775722e636f6d2f3136367958385a2e6a7067.jpeg)

![[Tutorial] How to install the unaccent extension for PostgreSQL 9.3](https://blogger.googleusercontent.com/img/b/R29vZ2xl/AVvXsEjcoq9MiH90G8uctdK-lhKJOFlbqKDaikkr0aiRYF2OYvxSztQ5HvRSk-6UY630Dq7ybpevLD7EQqCMrJnFz2v3ZzFivvFQkWpfIg1QjPlfhqKzf1otFUbjno2E5OA4K4iNwQ02Blz6LAMH/s72-c/postgresql-the-world-most-advanced-open-source-database-postgres-sql-unaccent-extension-install-fernando-paladini.jpg)
![[Tutorial] Como instalar impressoras HP no Ubuntu / Linux](https://blogger.googleusercontent.com/img/b/R29vZ2xl/AVvXsEjmXPOCfz6Rehyphenhyphen1ejh0nvDOicJdnyl4YjgYDvfqTMy_uIPBqKOddzsWNT3cCGn2yZC3DX16IpNx1h0qJ1x9RwXFX5rxs-Yv8SdSh8DdskcaFp4BMzrFwgk9G5HCJBX5DudGUOrKaaRI8ZRL/s72-c/HP-Device-Manager-Linux-Ubuntu-Elementary-Printers-Impressoras.png)
![[Tutorial] Como ativar o clique no botão do meio (scroll) do mouse no Fedora / Ubuntu / Gnome](https://blogger.googleusercontent.com/img/b/R29vZ2xl/AVvXsEgShl-MKryl4x5scVHnq6d4yd7HbNAkXY1ZgdKUir5RaAvKgy-e5QqCGp-AwPY5x9fx7KHRZGrugrE-R4GJzPzGZLyKAz_qjQ4iEu5Qpe03C53vHmTXpSeNyPl__4ZMpbcL7oCPfYWvu2f6/s72-c/mouse-middle-button-click-center-fernando-paladini-tutorial.png)
![[Tutorial] Como ativar o clique do touchpad no GNOME](https://blogger.googleusercontent.com/img/b/R29vZ2xl/AVvXsEh7KCZ3sUv8gTqvVM5m0G7cE3OddhdPUt0xtxZA_pxKrZF8HoaBGQnP6N5OYOVs8_x5UrEUPUY1c6xS902xQRkR9MIvOQGphqByXoax5tvHEuP4XNhAZORAnDkSk7Y9xZ3GPsA0Ft1luJbL/s72-c/gnome-logo-tutorial-keyboard-mouse-fernando-paladini.png)


![[Resenha] Crime e Castigo - Fiódor Dostoiévski](https://blogger.googleusercontent.com/img/b/R29vZ2xl/AVvXsEij-IX1fkyK7DI2pg0poIBU3iKENv0InNrtpC481xNTyHXJY5NFOjfBVIQaH_R7stQDQPT_uBiQUkMUlxLwdpv4TkUcRLCmp7UDiI-yRxF55PAhLA7zWoLc4Ts_ryYvE_YAhRtxQJ8kuS5N/s72-c/raskolnikovs-flat-by-jeremiah-humphries-fernando-paladini.jpg)
![[TUTORIAL] Como desinstalar / remover pacotes .RPM no Fedora?](https://blogger.googleusercontent.com/img/b/R29vZ2xl/AVvXsEiDBfUx5Stuo2oH_emtIv5wfpbG502N2NbtRg4lsKu6eRUdPVBKughOGPeae9BLrWmRveZPpY5Bzqi-nPL9cigRUUk2pOAeljWrvcQygM6UFEi27QwRthqWkb7jG5ow8iCi3SqH_J3qo0sa/s72-c/fedora-wallpaper-como-remover-desinstalar-pacotes-programas-rpm-how-to-uninstall-remove-packages-rpm-fernando-paladini.png)
AwesomeAWS Online Training
ResponderExcluirThis helps the readers a lot AWS Online Training Hyderabad
ResponderExcluirnice looking great aws Online Training Hyderabad
ResponderExcluirThe article was very clear and it's usefull information aws Online Training Hyderabad
ResponderExcluirkayseriescortu.com - alacam.org - xescortun.com
ResponderExcluirSMM PANEL
ResponderExcluirsmm panel
iş ilanları
İNSTAGRAM TAKİPÇİ SATIN AL
Https://www.hirdavatciburada.com/
HTTPS://WWW.BEYAZESYATEKNİKSERVİSİ.COM.TR/
Servis
tiktok jeton hilesi
A Dedicated server in Silicon Valley requires cutting-edge technologies for businesses seeking reliable & high-performance server solutions.
ResponderExcluir